Mastodon server tutorial

A step by step tutorial to create your own mastodon server (including screenshots) on Digital Ocean. It includes the mail server and the S3 bucket for images.
A quick note: This tutorial was written for v3.5.3 and minutes after writing it a new version of Mastodon arrives.
Preparing
Credit card required
To complete the steps in this tutorial you will need a credit card. If you don't have one search for an online bank that supports digital credit cards. Most of them have an easy onboarding process.
It was 02:00 in the morning and I couldn't sleep. And there was this new digital-only bank which was making waves. Just for fun I downloaded their app, created an account and took a picture of my ID. Within 20 minutes I had an account and a few minutes later I had a credit card.
Services that we will be using
Throughout this tutorial we will be using the following services (the links are affiliated)
- DO: Digital Ocean - For our webserver. $12 dollars each month
- MG: MailGun - For emails. The first 5000 each month are free.
- S3: Amazon S3 - For uploading/downloading files (price calculator)
Signup and hand over your credit card. Unless your server becomes very popular you will most likely spend less than $15 dollars a month.
Domain
You will also need a domain. And the first tip I will give you is that mastodon should not be hosted on the root of your domain. My domain is poweredbydev.com but for Mastodon I will be using s.poweredbydev.com.
Once you have registered a domain modify the nameservers to point to those of Digital Ocean. The instructions should be fairly straight forward even if you are domain is registered by one not listed.
Tip: DNS updates can take a while so I strongly recommend using a TLS of 900 seconds (15 minutes). There are some pro and cons of higher and lowering that value, but that is a whole other topic.
Step 1: Preparing our mail
In this tutorial I will be using mailgun for sending emails. I will assume you have created an account and entered your credit card information so that you can use other domains than the sandbox.
Create the mail domain
The first step is to create a custom domain in mailgun. In my case that will be on a non-existing domain m.poweredbydev.com which is recommend by mailgun and so that we later always have the option to add a mailserver on our primary domain. Once you enter the domain (and select the primary region) you will instructions to create the DNS records and for this we go to digital ocean.
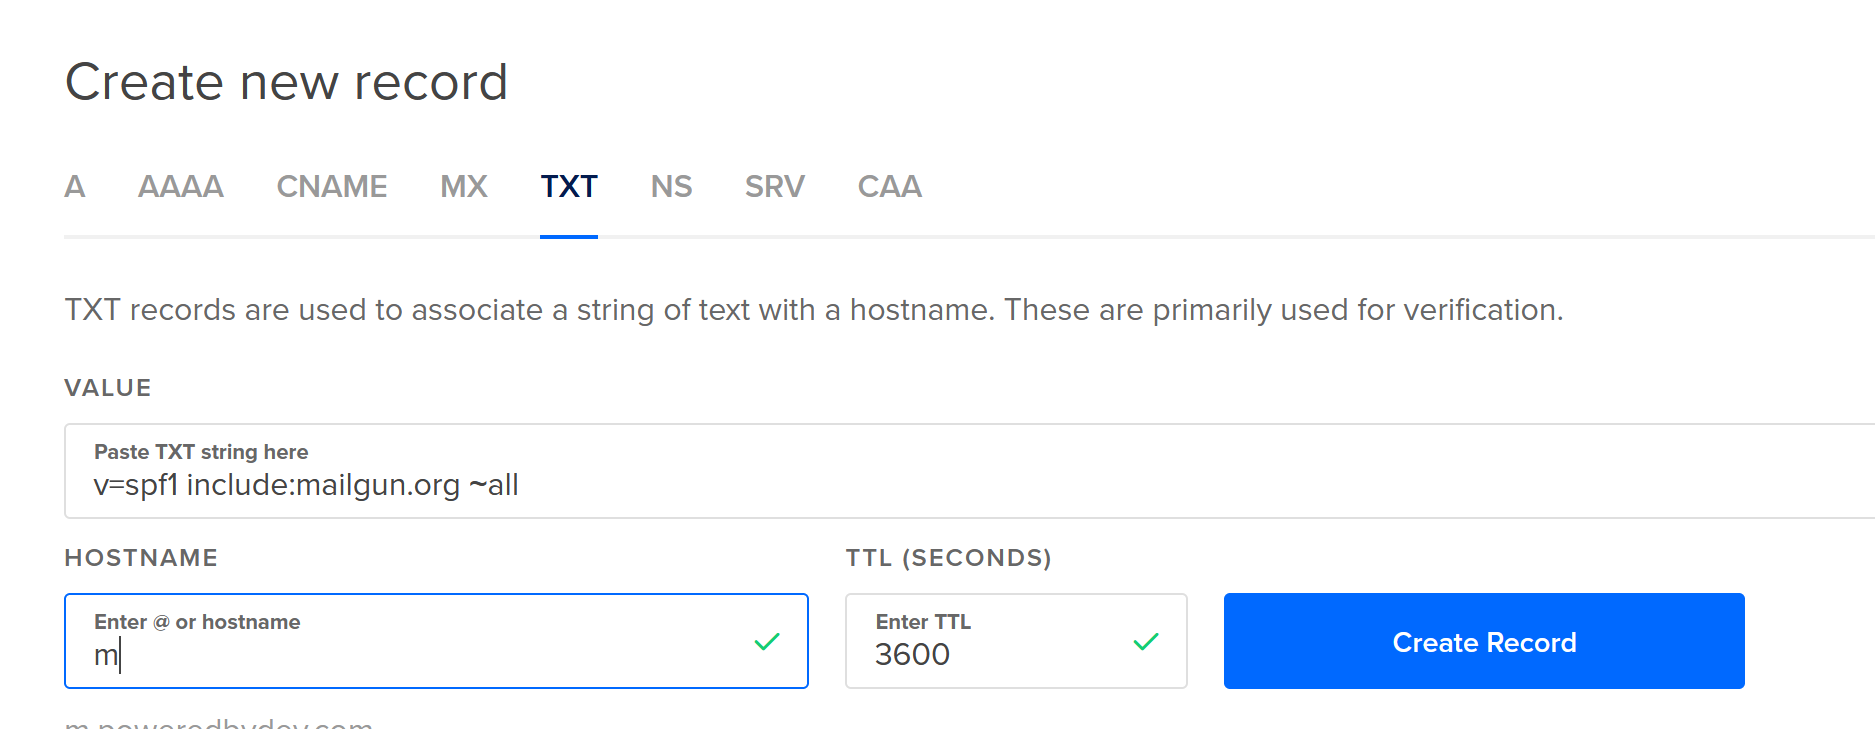
Add SPF record
The SPF record is to inform mail servers receiving mail from your domain that servers below mailgun.org are allowed to send mail in your name.
- Type:
TXT - Hostname:
m
(which completes tom.poweredbydev.com) - Value:
v=spf1 include:mailgun.org ~all
Add the DKIM record
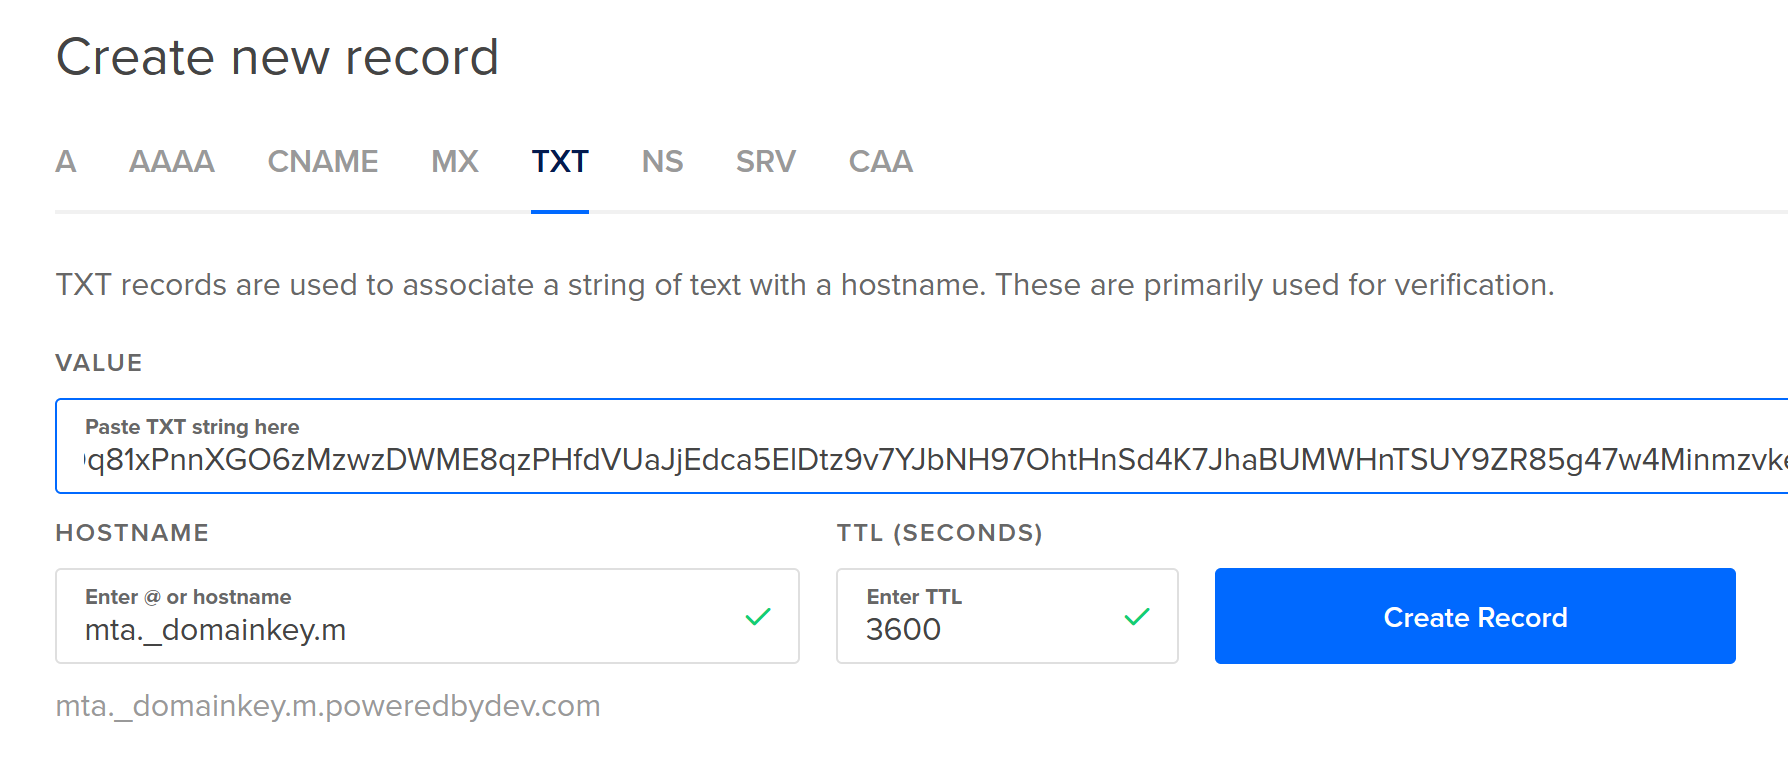
The DKIM record is similar to the SPF record, but it acts as a public key. Whenever a mail is send it gets signed by the mailserver and this public key allows other mail servers to verify that the mail is actually send by these servers.
- Type:
TXT - Hostname:
mta._domainkey.m
(which completes tomta._domainkey.m.poweredbydev.com) - Value:
k=rsa; p=<a very long alphanumeric string>
Add the 2 MX records
Add the two MX records. A MX record tells the internet that this mail servers is used for this domain. MX records differ from TXT in the sense that MX records are about routing.
- Type:
MX - Hostname:
m
(which completes tom.poweredbydev.com) - Priority:
10
(same for both) - Mail Service:
mxa.eu.mailgun.organdmxb.eu.mailgun.org

Add the CName record
The CName record is an alias can be used by mailgun for bulk email to add unsubscribe to it.
- Type:
CNAME - Hostname:
email.m
(which completes toemail.m.poweredbydev.com) - Value:
eu.mailgun.org

Verify if your mail is working
Once everything has been created, click verify. If not all validations are green double check your records. If all records are correct either missed something or some other some cases not all the verification are green the first time (either because you missed something or because the DNS have not yet updated the changes).
Get the SMTP credential
Once everything is working, click on "SMTP" in the overview and copy the username and default password.

Step 2: Setting up s3 (highly recommend)
Warning: These steps need to be double checked. I modified the configuration a few times to ensure I got it correct.
Although it is easier to put all the files on the server, I would strongly recommend setting up an Amazon S3 bucket for images and other content. That way when a post with an image goes viral your own server doesn't get hammered by requests for that image.
Create the S3 bucket
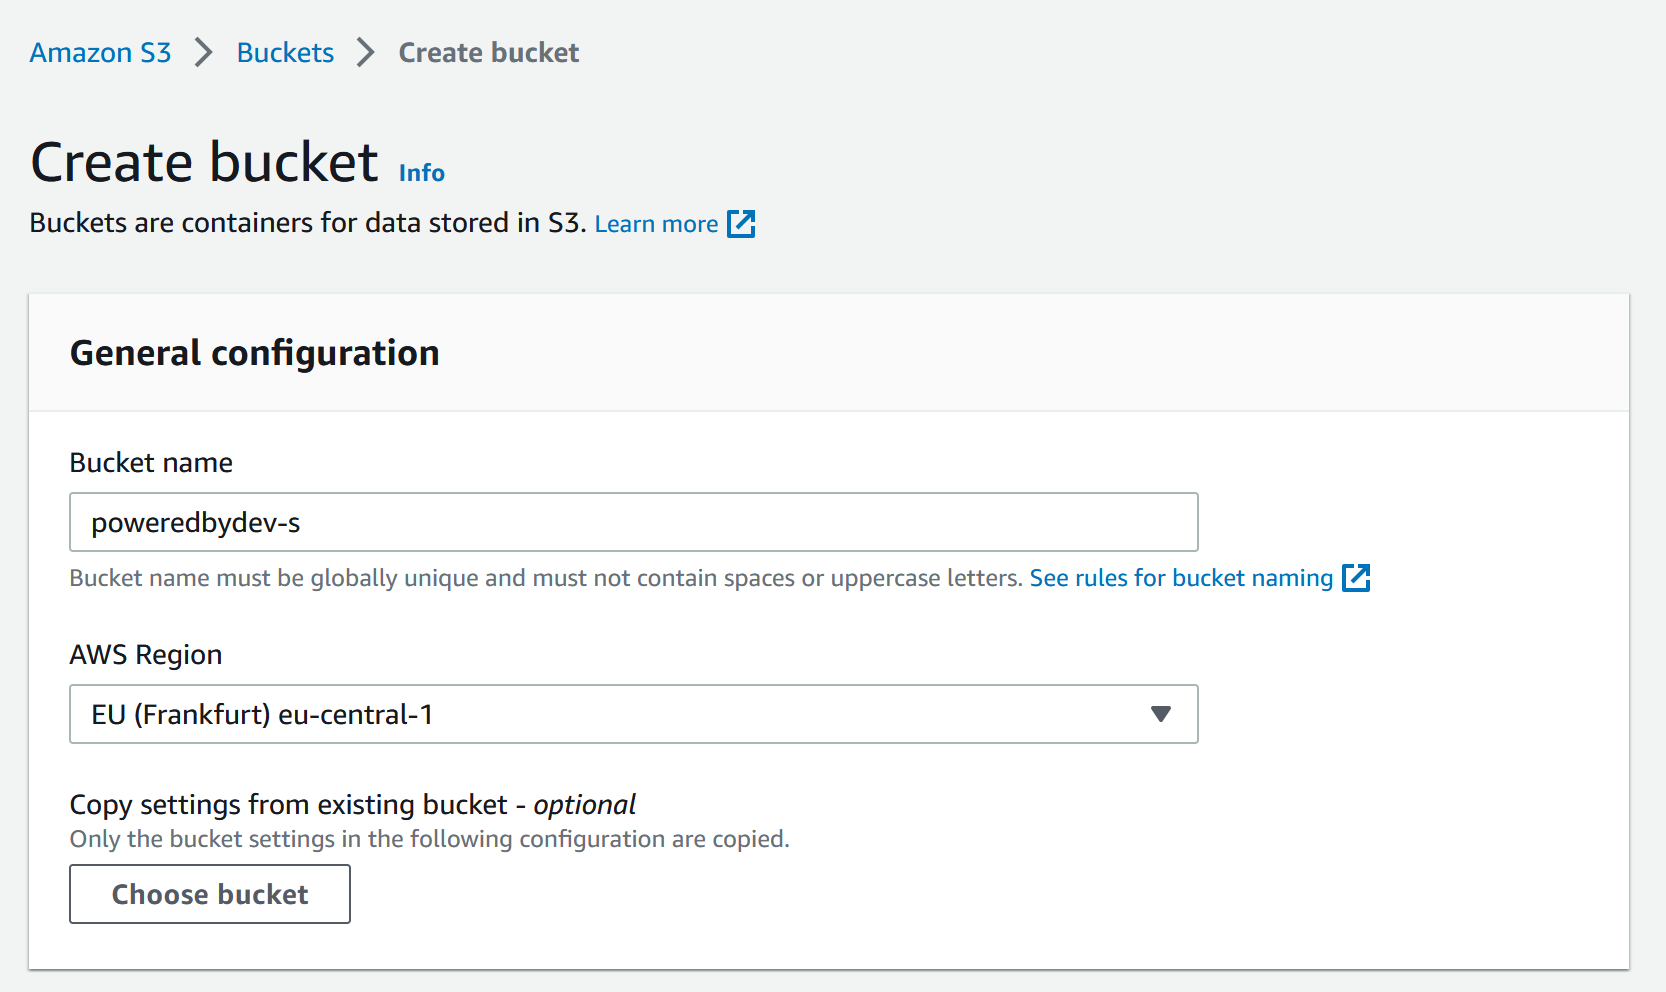
Once you have logged in to AWS search for S3 in the search bar at the top. Then on the right side click on "create a bucket".
Give the bucket a name (in my case poweredbydev-s ), but don't use any dots. Select a region (in my case eu-central-1)
Scroll down to "Object Ownership" and click on "ACLs Enabled". We need the ACL (which stands for "access control list" so that we can configure a bit easier).

Remove the checks for "Block Public Access" and enable the check for "Turning off block all public access might result in this bucket and the objects within becoming public" This is required because we want the files publicly available.
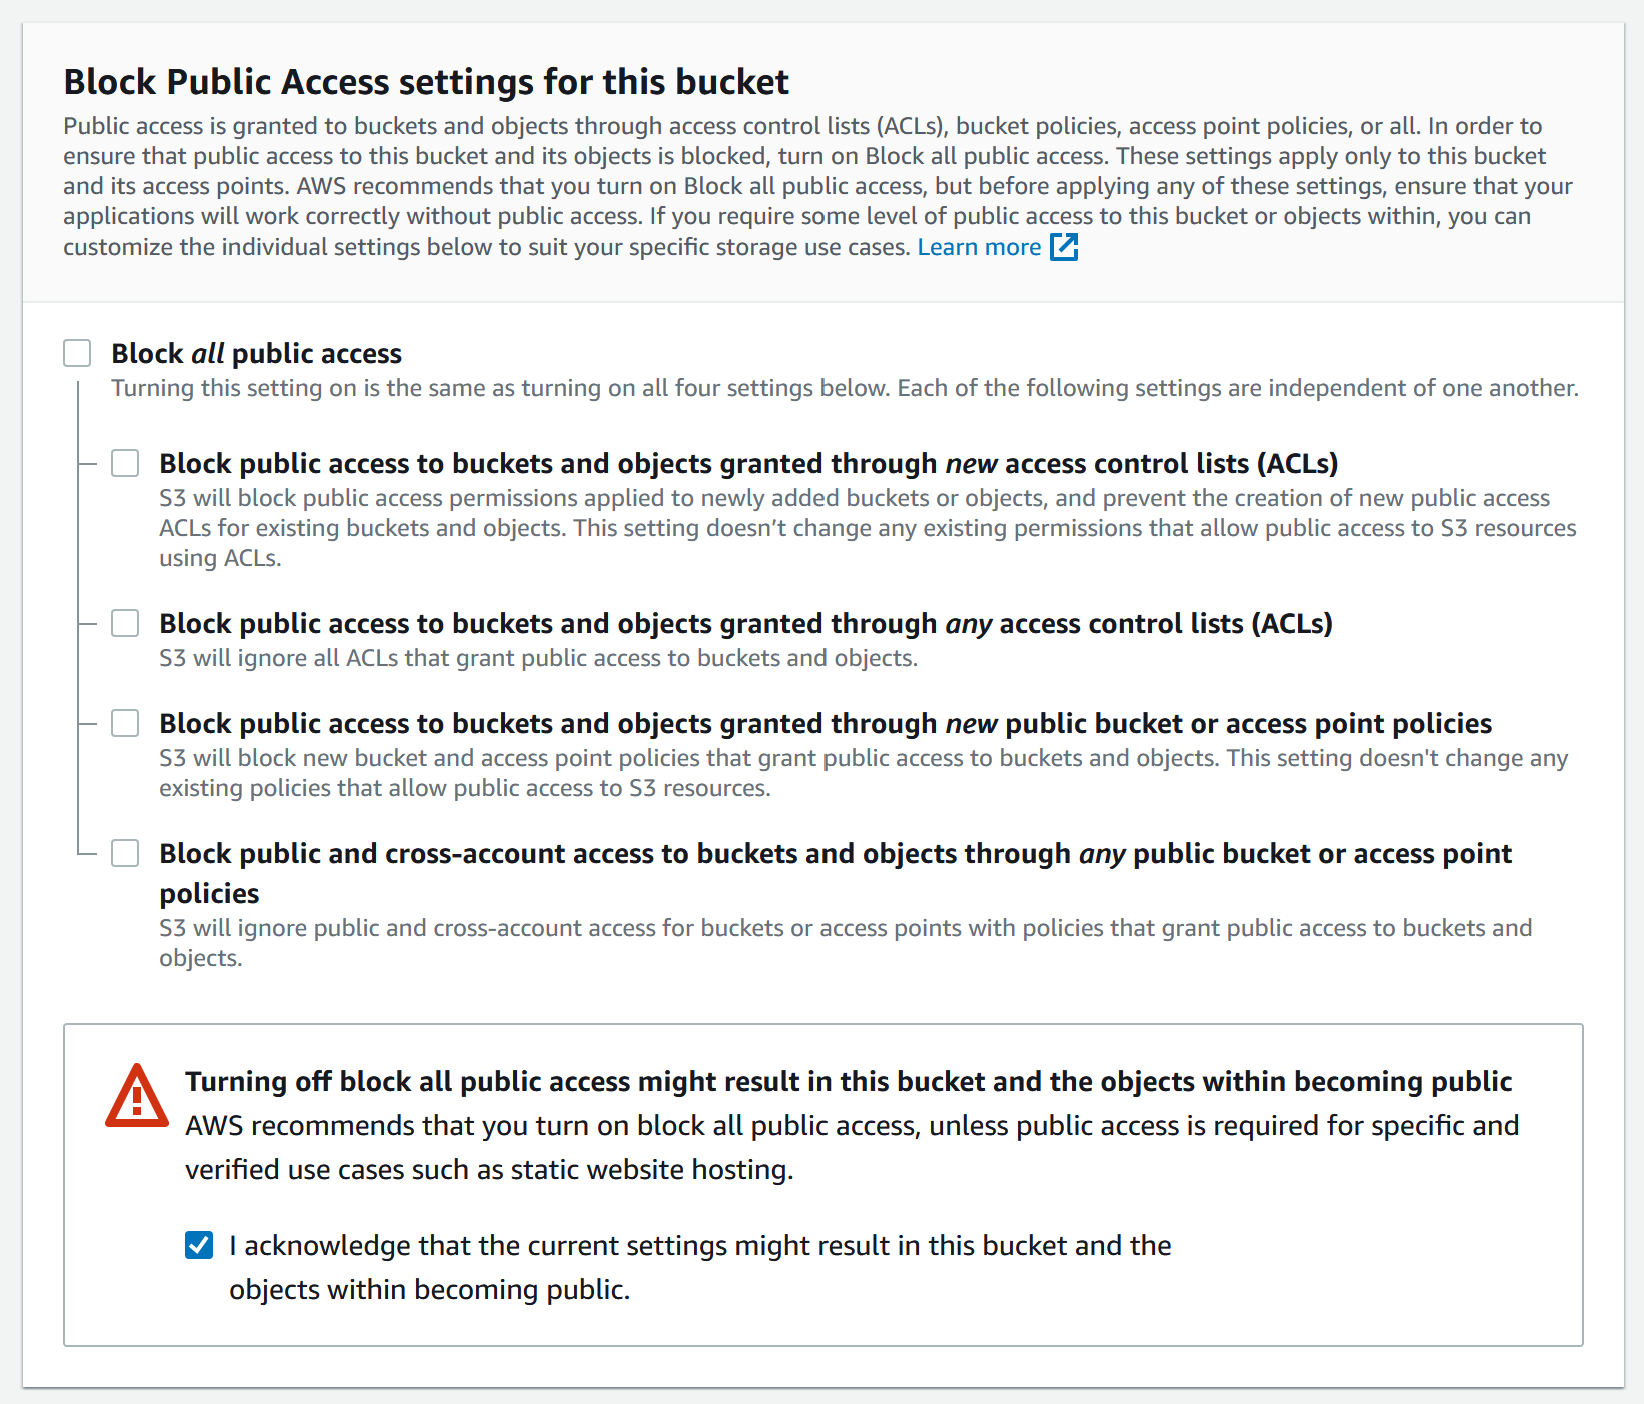
Everything else can stay as it is. Scroll down to the bottom and click on the "Create" button. If all has gone well you now have an s3 bucket that is public for everyone. But we still need to make one more change.
Create the user for uploading
Although anyone can access the content of our bucket we also need a way for our server to upload files.
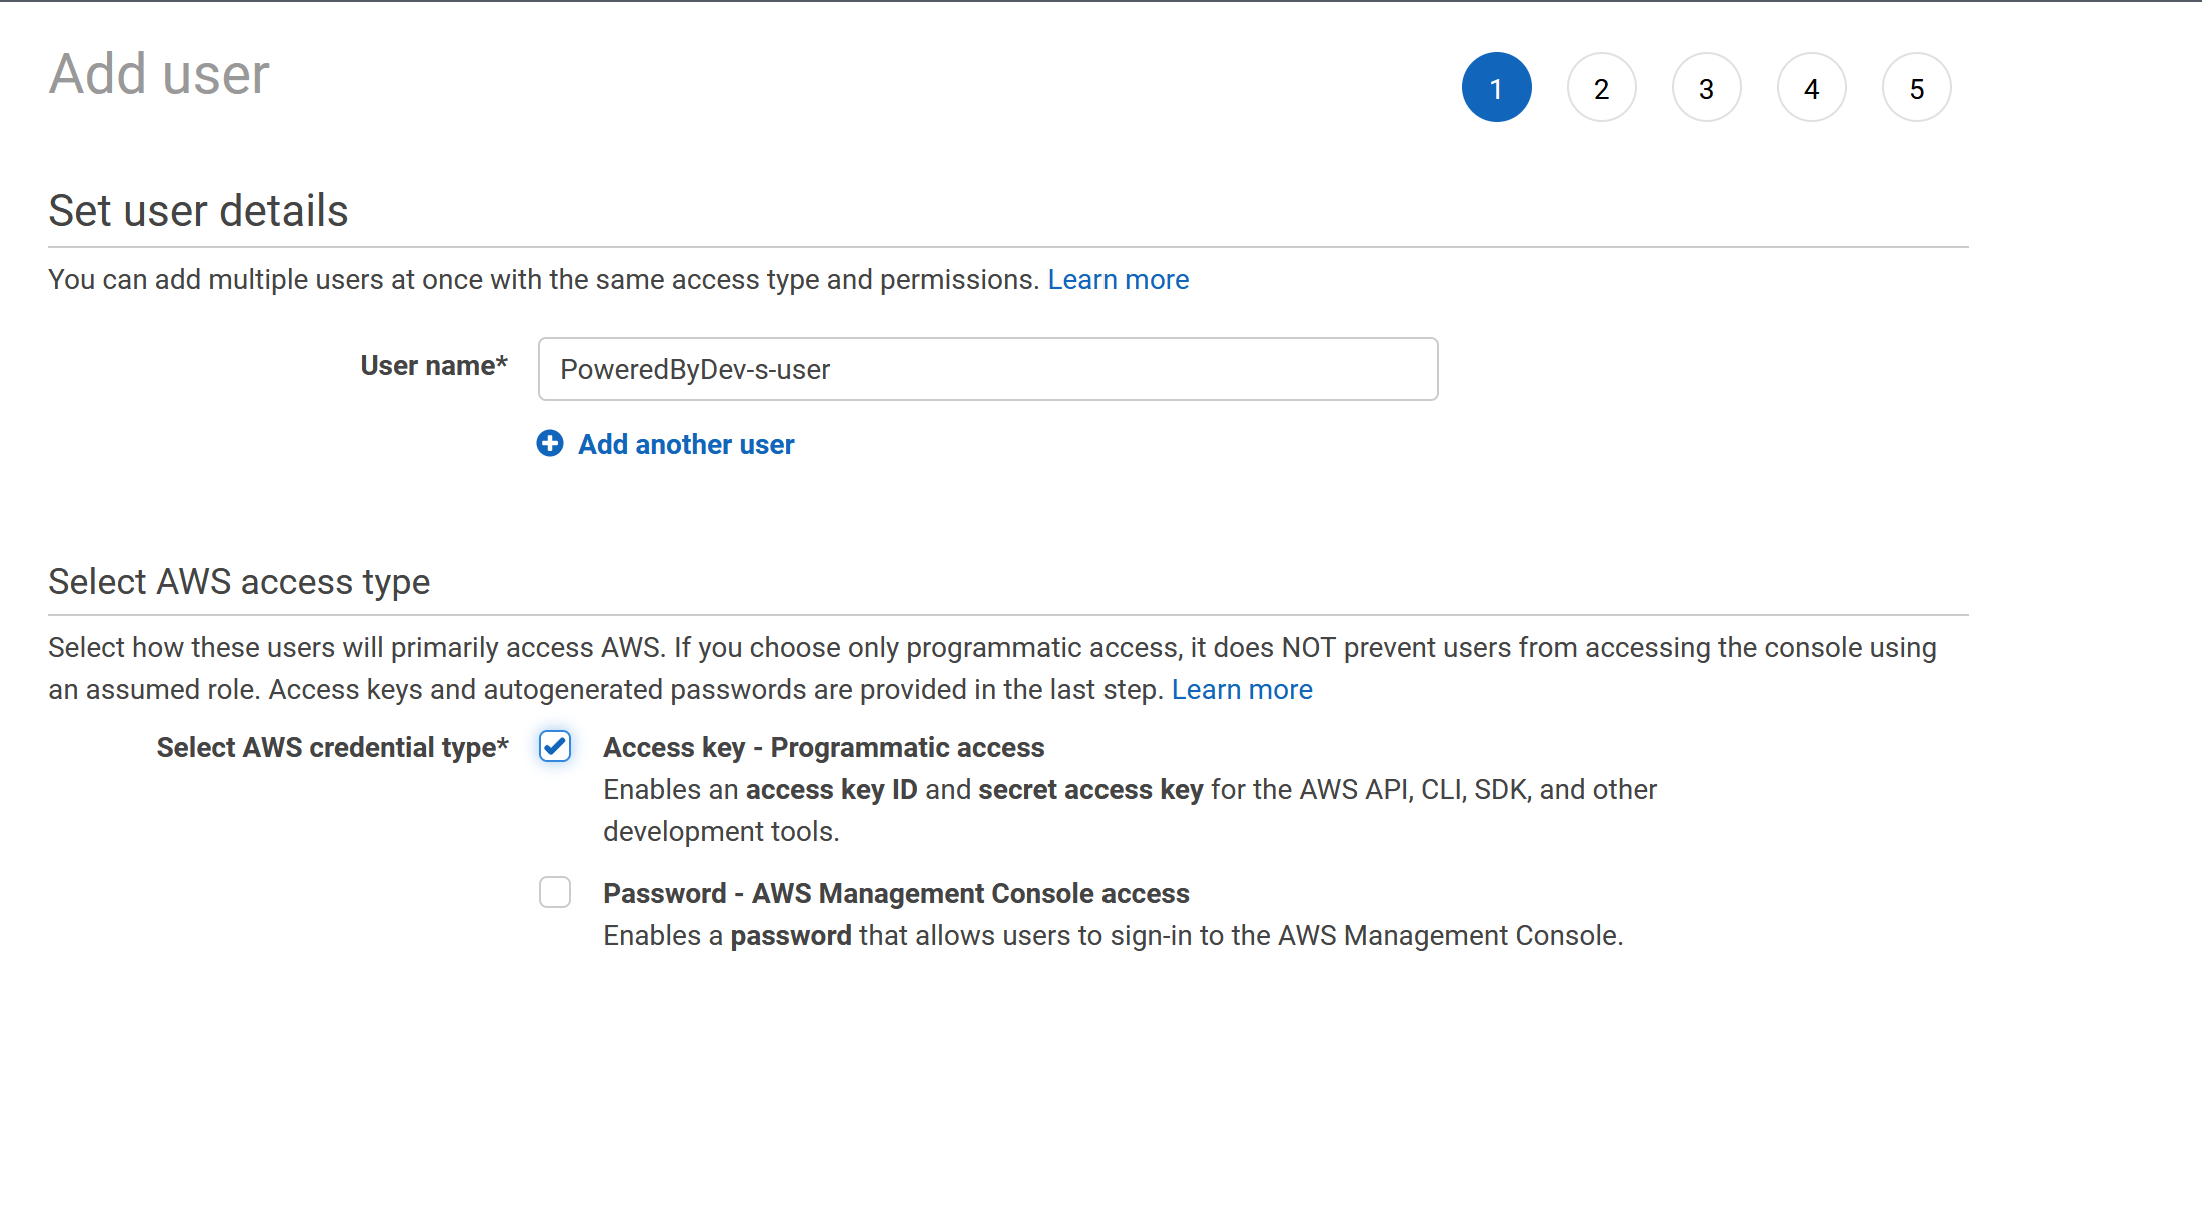
In the search bar at the top enter "IAM" which stands for "Identity and Access Management" and click on it. Then click on "Users" and finally on "Add user". Give the user a proper name (in my case PoweredByDev-s-user) and select "Access key - Programmatic access". Click on "Next: Permissions".
In the next screen add the user to the group that can access the S3. For this we need to create a new group and give it a policy for access the S3 bucket. In the screenshot I have chosen AdministratorAccess for now since I will be securing the system later. A better option is AmazonS3FullAccess and the best option is to create a custom policy for writing to a specific S3 bucket.

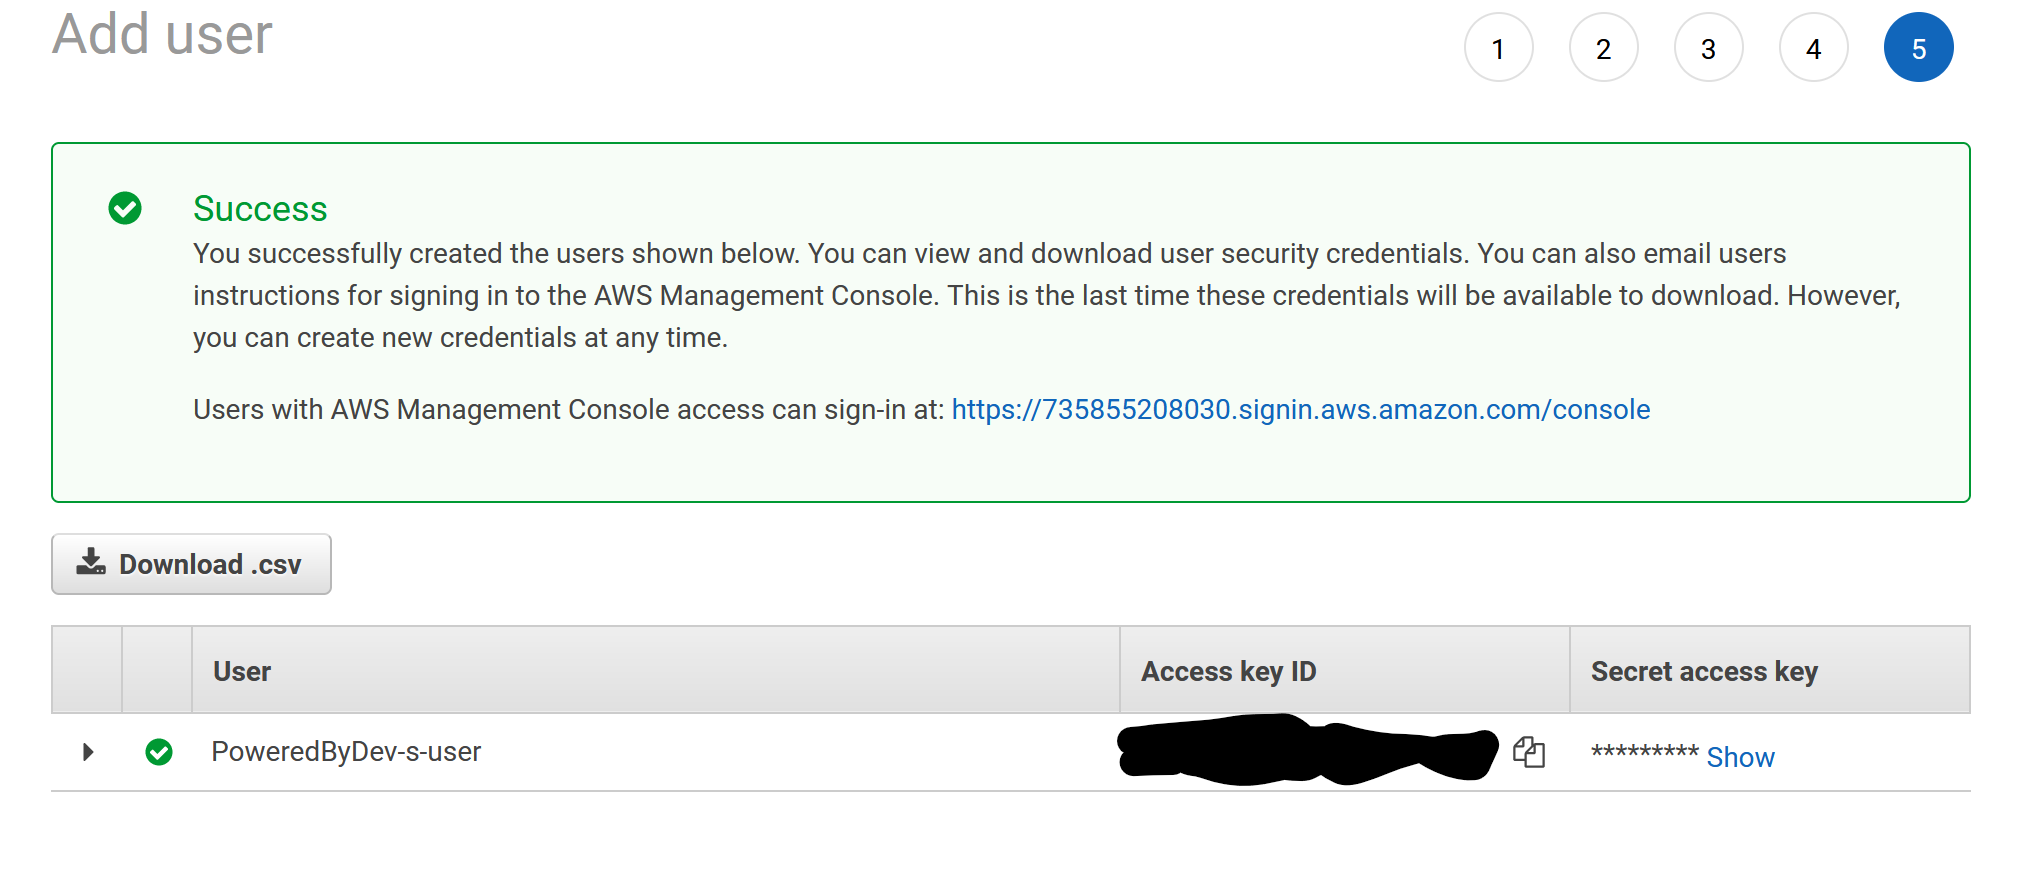
Once the group has been created, click "Next" until you arrive at the final step. On this page copy the Access Key ID and the Secret Access Key. We will need those later when we configure the Mastodon server.
Configure remote access
Originally this page contained instructions on how to make your S3 public for everyone, but that is expansive in the long run.
The next thing we need to do is create a CloudFront, which is a proxy for our S3 bucket. This will result in a custom domain where others can download files from our S3 bucket.
- In the search bar at the top enter "CloudFront" and click on it.
- Then click on "Create Distribution".
- For the "Origin Domain Name" select the S3 bucket you created earlier.
- For the "Origin Path" leave it empty.
- For the "Origin ID" enter a name (it should be automatically filled in).
- Click on "Save Changes".
After a while the distribution will be created and be online. Click on the ID of the distribution and copy the domain name. We will need that later.In my case it was d3acu44xjss453.cloudfront.net
Note that the domain name will be different for you. It will be something like d3acu44xjss453.cloudfront.net where the first part is a random string. But you can also use a custom domain name. For that you need to create a CNAME record in your DNS pointing to the domain name of the CloudFront distribution. In my case I decided to skip that step and use the default domain name.Step 3: Creating the server
NOTE: In this stage we also need to have created an SSH key and uploaded the public part to Digital Ocean.
Creating the droplet
Login in to Digital Ocean, and go to "Create Droplets", instead of a distribution we choose an image from the marketplace. Simply search for "Mastodon" and click on it.
Select the type of machine you want, assign the SSH key (this is required!), give it a logical hostname and click on "Create".

Once your server is up and has an IP go to the domain and create an A-record.
- Type:
A - Hostname:
s(completes tos.poweredbydev.com) - Will Direct to:
<select your new created machine> - TTL:
900
If you go to the url https://s.poweredbydev.com we should see a welcome page telling us to follow the instructions.
Configure the droplet
Connect to the droplet using SSH and answer all the questions.
- Domain name:
s.poweredbydev.com - Do you want to store user-uploaded files on the cloud:
y - Choose:
Amazon S3 - Enter the bucket name:
poweredbydev-s - Enter the region:
eu-central-1 - S3 Hostname:
s3.eu-central-1.amazonaws.com - S3 Access Key:
the key that was given when the S3 user was created - S3 Secret Key:
the key that was given when the S3 user was created - Do you want to host the uploaded files from your own domain?
y - Own domain for uploaded files:
d3acu44xjss453.cloudfront.net - SMTP.Server:
smtp.eu.mailgun.org(because I selected the EU) - SMTP Port:
587 - SMTP Username:
SMTP username of mailgun - SMTP Password:
SMTP password of mailgun - SMTP Authentication:
plain - SMTP OpenSSL Verification Method:
none - Email address:
Mastodon <notifications@s.poweredbydev.com> - Send test mail: No (or yes)
- Create admin account, enter your name:
DevWouter(since I don't want a generic "Admin" account). - Enter the email of the admin
- Copy the password for the admin shown in the console
- Enter urgent HTTPS renewal email (we use a free service to get an HTTPS certificate).
Once all of the above is done you can finally go to s.poweredbydev.com and login. Just a few more steps!
Securing the server
Three more things:
- Change your password and enable 2FA. You're an admin, so act like it.
- Enable/disable/limit the way new user can register.
- Set the "Server Rules", write the description and upload an image.
Maintaining the server
The first thing you want to do is set up the jobs for regular removing files. Even with a single account I had more than 13 GB of media.
Login in to your server and switch to mastodon user and create a new cronjob
sudo su - mastodon
crontab -e
Then ensure the following commands are entered.
@weekly RAILS_ENV=production /home/mastodon/live/bin/tootctl media remove
@weekly RAILS_ENV=production /home/mastodon/live/bin/tootctl preview_cards remove
Once that is done verify that your cronjob is configured correctly.
crontab -lFinal words
And finally have fun. Start following people (I'm at https://s.poweredbydev.com/@DevWouter) and start interacting with others.
